Grill Nation

All Griller. No Filler. 100% BBQ.

  • Home
  • About
  • Contact

Cedar Planked Salmon on Weber Charcoal Kettle Grill

June 30, 2018 By Dr. T Leave a Comment

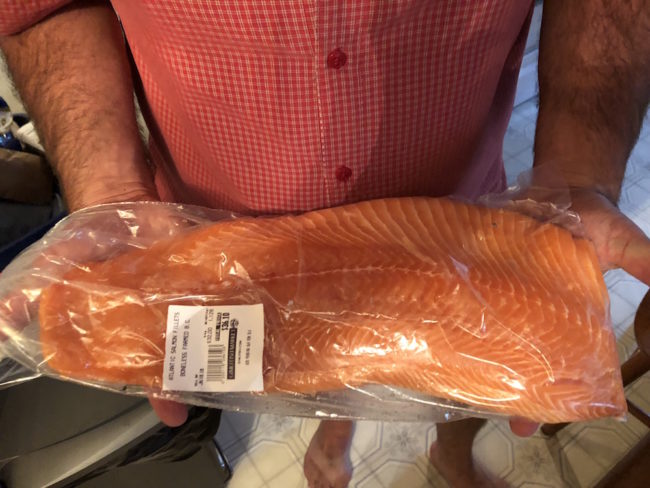
1 Kilo of Canadian Salmon

1 Kilo of Canadian Salmon Goodness

Saw this B.C. beauty being unloaded at the fish market and got inspired.  When asked “How much of it do you want?”, just had to respond: “All of it.”

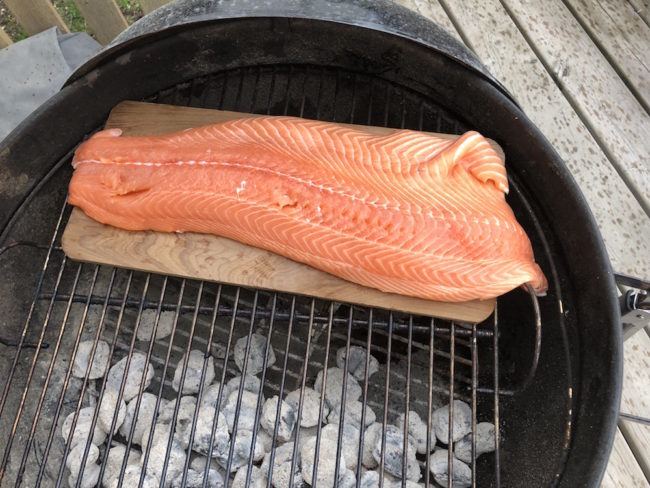
Salmon on the Weber Grill

Salmon looking good on the Weber Grill

Soaked a cedar plank for a couple of hours, then fired up our Weber Charcoal Kettle Grill. Used one Weber Rapidfire Chimney – full of coals (handy, that thing). Set up the salmon to cook over indirect heat –  top vent closed ~75%-  for about ~20/25 minutes.

We used Humble and Frank Salmon Finishing Rub (found it at the local Safeway – nice!) to season it up.

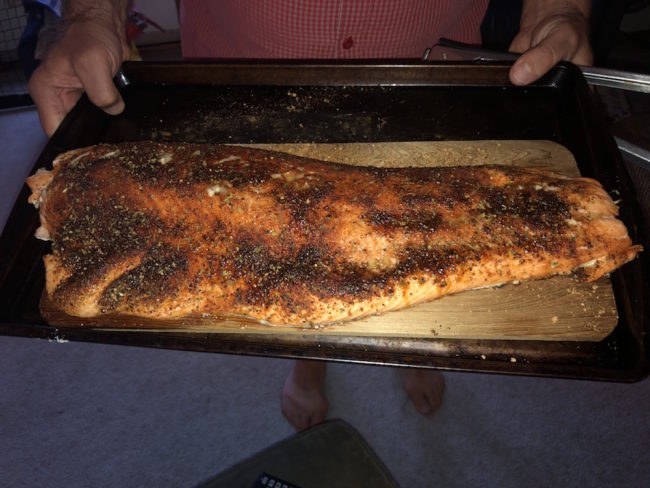
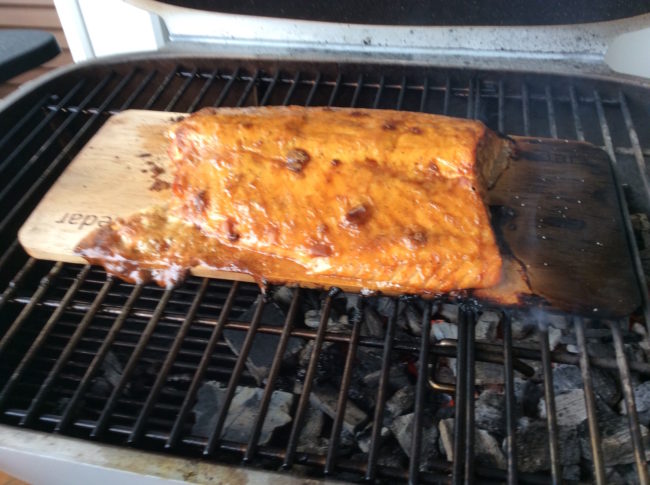
Cedar Planked Salmon - ready to serve

Cedar Planked Salmon – ready to serve

Looked and tasted spectacular – nothing like fish on the charcoal grill.

Filed Under: Grill School, Love Your Meat Tagged With: cedar planked salmon, salmon, weber charcoal grill, weber chimney starter, Weber Rapidfire Chimney Starter

Reverse Your Approach to Grilling with the Reverse Sear

August 28, 2017 By Ms. K Leave a Comment

Steak that’s tender and juicy on the inside with a gorgeous, delectable crust on the outside. Sound good, right? In fact, it sounds perfect. That’s why you’ve got to try the reverse sear method.

Basically, the reverse sear method means smoking your meat low and slow at first, finish it off over the high heat of blazing-hot coals, and serve immediately. It may fly in the face of what you’ve heard all our lives (it did for us) – get the grill searing hot right away, throw the meat on for a few short mins on each side, then tent and rest. But, when you think about what we’re all after – juicy, beefy inside with a pleasing crust to seal it in – doesn’t the reverse sear make so much sense?

Two Cook Zones on PK Grill

Yes.

And it works.


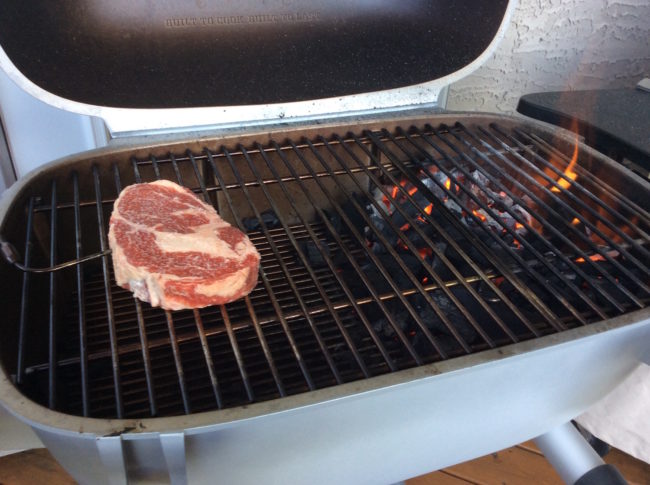
We grilled up a thick ribeye using this method on our PK Grill – which is the perfect grill to accomplish the reverse sear. Not only is setting up two different heat zones side by side is so easy – a ‘cooler’ indirect heat side for smoking, and a hot direct heat side built up with a neat pile of fiery charcoal for the sear – the adjustable vents allow you to harness the power of the hot coals to turn the cool side into a smoker.

We really like the degree of control we have over temperature and smoke due to the adjustable vents on this unit (two in the lid, two underneath) which you can open or close to get things just right. We created direct and indirect sides in our PK Grill by opening the lower right side vent (the one underneath the coals for the searing stage) and also opening the “opposite” vent (the upper left vent), keeping the other two vents (lower left and upper right) closed. This allowed air to come in through the lower right vent to superheat the coals. It also allowed the smoke from the hot side to be drawn toward the open upper left vent, drifting over the steak while it cooked on the indirect heat side — and thus smoking it low and slow.

Prepping for High Heat with Bacon Fat

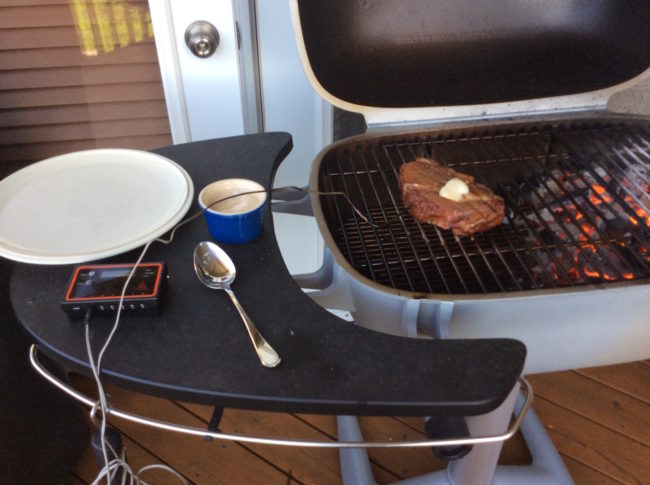
In terms of numbers, we aimed to get our indirect heat side to about 250 degrees Fahrenheit. Again, we could achieve this level of precision by adjusting the vents described above and monitoring the temperature of the grill and the meat with our handy Fireboard digital thermometer (read our Fireboard post for more info). Our ribeye smoked on the indirect heat side for ~25 minutes, with the lid closed of course. We monitored the temperature of the meat (also with the Fireboard thermometer) and cooked it until abou1 110 degrees before the sear stage (we were aiming for a final temp. of ~130 degrees for a beautiful medium rare).

High Heat Searing Action

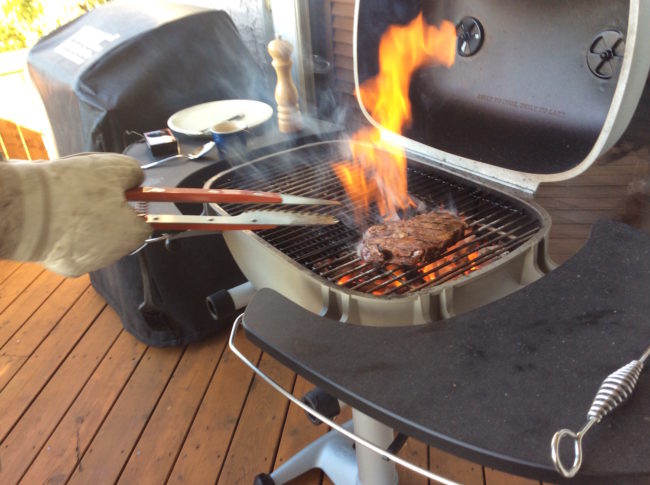
The direct heat side took about one chimney starter full of charcoal, and we tossed on a block of white oak for good measure. When we were ready to get the situation sear worthy, we opened up the lid as well as all the vents and got our coals as hot as hot can be. (For added ribeye yum, we used the decadent technique of slathering the meat with bacon fat just before putting it on the high heat. The salty, bacon-y goodness melts into the steak which will soon melt in your mouth.) Not surprisingly, we got some flare up with all that fat and heat (which looks dang cool in pictures, right?, and they key was turning them meat often – every five or ten seconds – for not much more than a minute, in order to caramelize and not burn the outside.

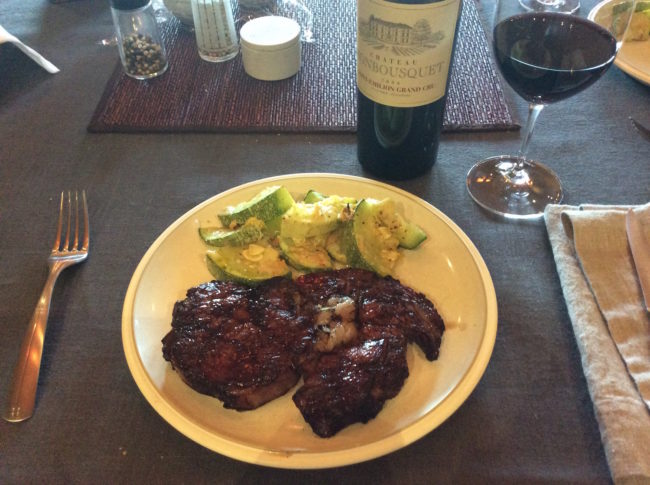
The next critical step is to serve a.s.a.p – no resting. With the traditional high heat/short cooking time method you’re resting the meat to get the juices that have be retreated center-ward from the heat to redistribute inside. With the reverse sear, there’s no need because the meat has basically cooked slow and low with a quick sear at the end (thus no panicky, retreating juices). In the end our reverse-seared ribeye was off-the-hook tasty.

Glorious! (So glorious, in fact, we needed to pair it with a gorgeous wine from Bordeaux – a 2006 Chateau Monbousquet from Saint Emilion. A dinner for the ages!)

Winner, Winner – Ribeye Dinner

– Ms. K

Filed Under: Grill School Tagged With: bacon fat on steak, charcoal grill, PK Grill, reverse sear, ribeye steak

Cedar Planked Salmon on the PK 360 Grill and Smoker

July 31, 2017 By Ms. K Leave a Comment

Cedar Planked Salmon is a delicacy we’re so glad we learned how to pull off. Spreading dijon mustard over the fish and adding a generous sprinkling of brown sugar creates a heavenly alchemy of smoky, glazed goodness.

For years, we’ve been using our Big Green Egg to make this tasty dish with awesome results. We wanted to give it a whirl on our new PK 360 Grill and Smoker, and were very satisfied with how it turned out.


Below is a pic from our first try, where, while yummy, we felt we could have achieved a slightly more cedar smoked taste:


Cedar Planked Salmon on PK 360 Grill and Smoker


We suspected the remedy was getting a more significant char going on the cedar plank itself,  so that’s what we did on attempt #2. Basically, we placed the cedar plank right over the coals (you’ll see it’s a bit offset in the photos above). We even rotated midway through to make sure the plank got a nice, even scorch. Much more cedar smokey goodness this way!


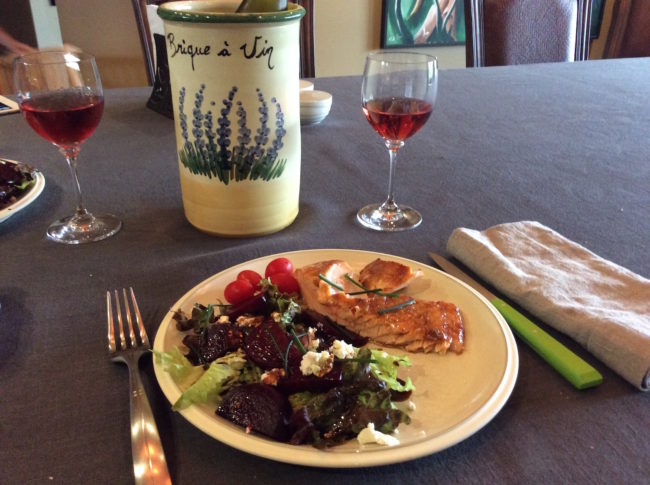
Cedar Planked Salmon with Roasted Beet and Goat Cheese Salad


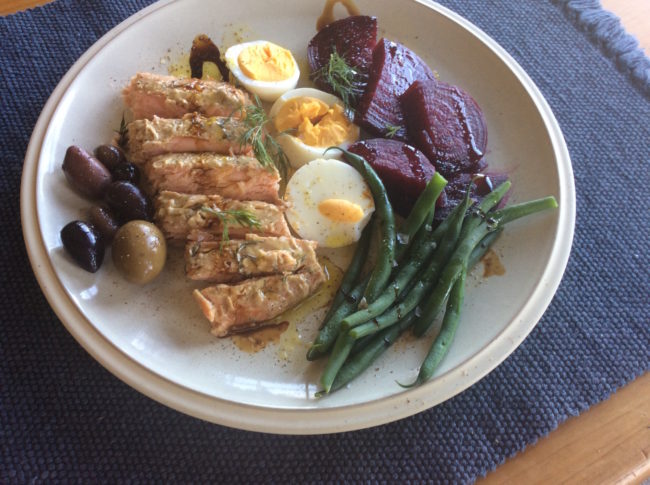
On both occasions, we smoked up one of those really generous-sized Atlantic Salmon fillets. Since we’re only feeding two around our table, there were delicious leftovers in addition to our dinner. I love eating cedar planked salmon cold, as in this ‘modified’ nicoise style salad, with a hard boiled eggs, olive medley, and roasted beets, blanched green beans, and fresh dill from the local Farmer’s Market. Drizzled with aged balsamic vinegar and a fine extra virgin olive oil  – not a bad way to do lunch:


Cold Salmon with “Nicoise-Inspired” Salad

And I still have some for tomorrow! 😉

Ms. K


Filed Under: Grill School Tagged With: cedar planked salmon, leftover salmon, salmon on the bbq, salmon on the PK 360 Grill, smoked salmon

Legendary Dry-Aged Beef at Home with Steak Locker

June 13, 2017 By Ms. K 4 Comments

We’re now doing the dry-aged beef thing at home  – and loving it. This isn’t a how-to post (although look for some links and tutorials coming  soon). Here, we’re basically singing the praises of dry-aged beef and showcasing our new home steak locker. Maybe you’re in the market for a unit like this, so this will give you an idea of what it all looks and feels like. (It’s also gonna make you hungry and get you ‘hooked’, if you’ll forgive the meat locker pun…)

Dry-aged beef on the kettle grill


If you’ve ever had dry-aged beef – maybe at a high-end steakhouse – you know that it’s worth writing home about. There’s that rich almost nutty flavor, that delectable tender texture… If you’ve had it, you won’t forget it, and chances are you’ll be on the lookout for it ever-afterward. But here’s the thing – it’s not easy to find. Dry-aging is time consuming and expensive. Retailers aren’t going to  spend all that time and sweet moolah – especially when there’s the cheaper, more time-efficient ‘wet-aging’ process available. In fact, when you see ‘aged’ beef, even at many upscale butcher shops (we’re talking from experience here), chances are almost 100% that it’s wet-aged (unless of course ‘dry aged’ is specified). Not that there’s anything wrong with wet-aged, but dry-aging takes things to another stratosphere. So if you’re like us and you’re hard pressed to buy dry-aged steak from the butcher – and you’re not going out for that ultimate steak every Friday night – you may want to consider dry-aging at home.


Bringing the High End Steakhouse Home


Before you get too excited though, be warned that this is not a cheap proposition. Getting set up at home is still costly (the unit we bought is about $1450 + shipping, etc.), and of course it still takes time, patience, and bit of know-how when it comes to butchering things up. It’s true that for the costs involved you could go out for a whole whack of ultra-primo steak dinners – but the thing is, you won’t and you know it. Not only that, if you love your meat, you know that price isn’t the only consideration, right? It’s just damn interesting, satisfying and cool to do it yourself, for starters. And suddenly (or actually, 30+days later), you’re eating the ultimate meal in the comfort of your own home with everything else exactly to your taste –  from choice of beverage, to music, to color of weekend sweatpants, if that’s your thing.

Steak Locker from ELA


As you can see from the photos, you can banish those images of yourself training amongst sides-of-beef hanging from meat hooks Rocky-style somewhere on your property. (This is a good thing because while you may argue that that would be pretty awesome, your wife wouldn’t like it.) You can think more in terms of a large wine fridge to get a sense of size, except instead of gazing at racks of Cabs and Merlots, you’re going to stare down a subprimal cut of beef for the next few weeks. (It’s a bit of science, interior decorating, and ‘caveman’ all at the same time. If you keep it in the kitchen, be sure that everyone’s on board.)

Steak Locker showing beef a few days in…


Our new Steak Locker (from Elevated Lifestyle Appliances) is just under three feet high, and about two feet wide and two feet deep. So, it’s not tiny but we didn’t have to build an extra wing. It has a stainless steel and glass design so it could conceivably incorporate in various locations in your home, and might even match other appliances. And all you need to do is plug it in, just like a wine fridge – no special hook ups or other DYI magic needed. But it’s worth noting that it does have a fan that runs periodically, and there’s a glowing UV Light to deal with bacteria. So if you can tuck it away somewhere out of the main action at home, that’ll work. After all, you don’t need to do much more than throw the meat in there and wait.

Look close – after a couple of weeks beef is taking on that funky-looking color…


So far, we’ve done a 30-day aging, and then tried again with a 45-day aging  time (definitely more of a mushroom/blue cheese thing going on with the longer aging – tasted awesome). Each time, we celebrated with a blow-out steakfeast for between 6 to 8 extremely hungry folk, with leftover steaks to freeze for everyone to enjoy later (and the frozen ones were great, too – not always the case with steak, we find…). Next time we’re going beyond 45+ to compare, but even at 30 days we got the characteristic funk and flavor that had been eluding us. We’ll keep you posted – and if you’re doing the dry-aging thing yourself, tell us about it!


(Full disclosure – we keep our unit is in the fitness room in the basement, so we are channeling that Rocky thing just a bit.)

– Ms. K

Filed Under: Grill School Tagged With: dry-ageing, steak locker, steaklocker

Get Your Grill On: 5 Keys To Grilling Success

January 17, 2009 By Kevin Pearson Leave a Comment

Brats on the Grill at a Tailgate PartyWhether you’re a raw rookie behind your first grill or a seasoned veteran who can execute perfect 90 degree grill marks in his sleep, you’ll love the Grill Nation Game Plan where I lay down Grill Nation’s 5 Keys To Grilling Success. So pour yourself a little of what you like and read on…

1. Know Your Heat/Know Your Meat

Choosing Direct vs. Indirect heat is critical. As a rule, I like to use the Indirect Method when doing foods that require more than 20-25 minutes of grilling time. Whole chickens, turkeys, beef roasts, pork roasts and ribs are simply better when done this way. Direct Heat is best used for foods with total grill times of 20-25 minutes or less, and produces those classic grill or char marks that grillers love. Steaks, chicken breast, sausages, brauts and grilled vegetables are usually done this way. For a more detailed discussion see Chip Carter’s January 15th 2009 post – Gimme Fuel Gimme Fire: Direct vs. Indirect Heat.

2. Pregame=Preheat

Whether you played Pop Warner football, High School hockey, or Collegiate hoops, you had a pre-game ritual. You probably still do! Grilling is no different, and before that soon-to-be-perfect steak hits the grill, make sure your grill is preheated and that the temperature is steady. Preheat times depend on your grill itself, desired temperature, and environmental factors, but giving your gas grill 15 minutes to reach a steady state is good starting point. (Of course charcoal grillers have a different challenge – but we will save that for another day!)


3. Timing Is Everything

I can’t stress the importance of using a timer enough. Think of it as your game clock. As a general rule, meat that is grilled using Direct Heat should be turned only once and this should occur when you reach half your total grilling time. So, for example, on my grill a 1 inch New York Strip done over Medium/High Direct Heat takes about 8 minutes (medium rare) and should be flipped at the 4 minute mark. I don’t know about you guys, but when I’m grilling, there’s usually lots of distractions – having a countdown timer with an alarm keeps me tuned in. Ever seen a football game when the 40 second clock fails? Exactly.

4. Take A Temperature

Get a good meat thermometer and use it. Bottom line. All sorts of methods are out there for determining doneness and in my opinion none of them come without a cost. Cutting into meat while grilling causes tasty juices to be lost and just plain doesn’t look slick. Trying to compare the feel of the meat to the fleshy part of your hand at the base of your thumb? Come on, really. Does that make any sense? Get a good meat thermometer and use it. Most recipes will tell you what your target internal temperature is and after a few reps you’ll never be without one.

5. Pitch A Tent and Let It Rest

Once your culinary masterpiece comes off the grill, cover it with an aluminum foil ‘tent’ and let it rest 3-5 minutes. Resting allows the juices within the meat to redistribute evenly throughout so that they are not lost after the first cut. Do not wrap the meat in foil – in fact its best if the foil does not touch the meat at all.

I hope you find Grill Nation’s 5 Keys to Grilling Success helpful. They’re part of my Game Plan every week! And yes, my fantasy team crashed and burned (see Timing Is Everything: Grillers on the Clock) but March Madness and redemption are just around the corner!

Thanks for playing,

Kevin Pearson

Filed Under: Grill School Tagged With: bbq, beginner, grilling, learning, preheat, technique, temperature, tenting, thermometer, timing

Gimme Fuel, Gimme Fire: Direct vs Indirect Heat

January 15, 2009 By Chip Carter Leave a Comment


Heat Drama and Grillin

Every griller knows how important the heat from the burner or the charcoal is to that perfect steak – and to be honest, the beautiful part about grilling is the simplicity. But for those who want to expand their grilling horizons – you’ll be richly rewarded if you understand the different approaches to heat, as described below. And remember: whether you use charcoal or gas grills, direct or indirect heat – always grill with the lid down!
Direct Heat

To grill using Direct Heat, place your food on the grill directly over your grill’s source of heat. Turn the food once, when you are halfway through the total grilling time. DO NOT FLIP OUT!! I’m not a fan of multiple turns or flips – this result in unnecessary heat/cool cycles and produces inconsistent results. Not good. Anyway, Direct Heat is best used for foods with total grill times of 20-25 minutes or less, such as steaks, chicken breast, sausages, brauts and the like – not to mention your grilled veggies.


Indirect Heat

When you think indirect heat, think convection oven, but with way more flavor and way more fun!!! Heat rises from the heat source and bounces off the grill lid and surfaces, slowly and evenly cooking food from all sides. To grill using indirect heat, make sure food is not placed directly over your grill’s heat source. With charcoal this can be accomplished by placing charcoal under both sides of the charcoal grate. I like to separate the sides by placing a drip pan in the middle. On a gas grill, preheat the grill using all burners and once you’ve reached your target temperature, shut off your middle burner(s) directly under the food. Adjust the burners on each side of the food accordingly.

Don’t have multiple burners??? No worries – check out ‘Grill Gear’ section for the necessary upgrades you need my friend!

I like to use indirect heat when I’m doing foods with more than 20-25 minutes of grilling time. If you use indirect heat, you’ll soon find that doing whole chickens, turkeys, beef roasts, pork roasts and ribs becomes a tender and juicy snap.

DO NOT FLIP YOUR LID! – Ok, this may be a little harsh, feel free to open the lid to baste, and to check for doneness, but otherwise keep that lid closed, valuable heat gets lost and throws off your cooking time every time that lid pops!

Whatever method you deploy – be sure to tell us your grilling stories, share your secrets if you want, including pictures of your grilling spread on the Grill Nation forums!

Until next time,

Chip

“Gimme Fuel Gimme Fire – It’s The Grill That I Desire”

Filed Under: Grill School Tagged With: bbq, direct heat, grilling, indirect heat, temperature

Timing is Everything: Grillers on the Clock

January 14, 2009 By Kevin Pearson Leave a Comment

Timing Is Everything

I believe it was the great Vince Lombardi who once said (and I expect to be corrected by one of my fellow grillers out there if I’m wrong) “…we didn’t lose, we just ran out of time…”.

The importance of timing in the game of football simply cannot be debated. Whether we’re talking about the play clock, the 40 second clock or the internal clock in a quarterback or a receivers head. “One thousand, two thousand, etc, etc.”


Timing is everything. Including in the great pursuit of that perfect grilling experience. I know, I know, you’re thinking that this Monday morning quarterback just can’t let Sunday go (did you see Denver go for two to win with seconds left against the Chargers instead of kicking the PAT – that’s chutzpah, but I digress…).

There’s method to my madness here. While we wouldn’t think of going onto the gridiron without the clock, we shouldn’t go onto the grill without the clock either. Bottom line – A timer should be an essential weapon in your grilling arsenal, plain and simple. Digital or analog, count up or count down, bells and whistles or vanilla – get one. Unlike the average football play which lasts only seconds, most grill times last considerably longer – so even Peyton Manning’s internal clock won’t get it done here!!!

Not only will a timer improve your grilling consistency under ideal conditions, but you’ll adapt better to whatever your grilling menu and mother nature throws at you! Its an inexpensive, simple grilling innovation that will elevate your game without creating a salary cap nightmare. If only things were this easy for my fantasy football team (can you say Tom Brady…).

Filed Under: Grill School Tagged With: bbq, grilling, timer, tips

Advertisement


Recent Posts

Bubba’s No Fussin’ No Frettin’ BBQ Sauce

Those that know me know that I love my Telecaster and that I love my sauce - so … [Read More...]

  • Chicken Legs With Weber Kick’n Chicken Seasoning Blend
  • Korean Inspired Pork Tenderloin with Cabbage, Garlic and Pho Broth, Veggies and Noodles
  • Cedar Planked Salmon on Weber Charcoal Kettle Grill

Follow us online

  • Twitter


Copyright © 2021