Grill Nation

All Griller. No Filler. 100% BBQ.

  • Home
  • About
  • Contact

Steaks Defined: T-Bone vs. Porterhouse

January 22, 2009 By Chip Carter

Hey Roy, “Love Ya Meat” from up here in Buffalo! Need you to settle a bet: What’s the difference between a Porterhouse and a T-bone?

Devon
Buffalo, New York

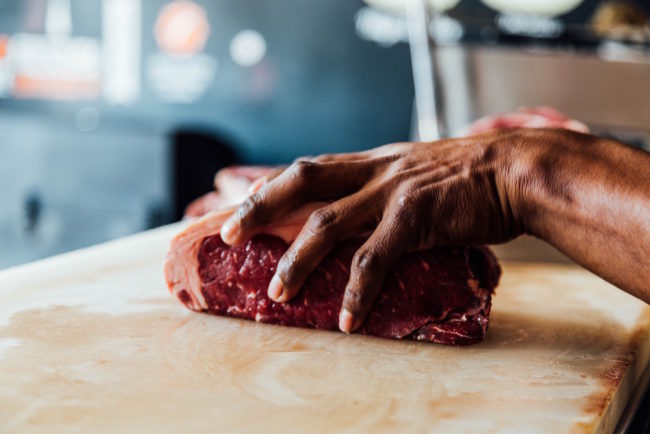
Thanks Devon. Lets start with what they have in common (other than being delicious and ideal for grilling!!!). Both the T-bone and the Porterhouse consist of a ‘T’ shaped bone with meat on each side. The larger side contains meat from the striploin while the smaller side contains meat from the tenderloin.

Example of Porthouse Steaks

Example of Porthouse Steaks

The Porterhouse is a big beautiful steak – pushing 2 to 2 ½ pounds. It’s cut from the large end (rear) of the short loin and contains more of the tenderloin than the T-bone. Usually pretty pricey, but worth every penny when the mood strikes you.


The T-bone is cut from the narrow end, which is further forward in the short loin and also very tasty!

But in case you need numbers to settle this bet, the good old USDA is here to help. According to their Institutional Meat Purchase Specifications document, the tenderloin must be at least 1.25 inches (32 mm) thick to be classified a porterhouse, while the tenderloin must be at least ½ inch (13 mm) thick for the steak to be classified a T-bone.

Nice.

Devon, you gotta let us know who won the bet and what the ‘steaks’ were!!!

Until next time – like I always say…

Love Your Meat,

Roy

Filed Under: Love Your Meat Tagged With: beef, porterhouse, steak, striploin, t-bone, tbone, tenderloin, USDA

Get Your Grill On: 5 Keys To Grilling Success

January 17, 2009 By Chip Carter

Brats on the Grill at a Tailgate PartyWhether you’re a raw rookie behind your first grill or a seasoned veteran who can execute perfect 90 degree grill marks in his sleep, you’ll love the Grill Nation Game Plan where I lay down Grill Nation’s 5 Keys To Grilling Success. So pour yourself a little of what you like and read on…

1. Know Your Heat/Know Your Meat

Choosing Direct vs. Indirect heat is critical. As a rule, I like to use the Indirect Method when doing foods that require more than 20-25 minutes of grilling time. Whole chickens, turkeys, beef roasts, pork roasts and ribs are simply better when done this way. Direct Heat is best used for foods with total grill times of 20-25 minutes or less, and produces those classic grill or char marks that grillers love. Steaks, chicken breast, sausages, brauts and grilled vegetables are usually done this way. For a more detailed discussion see Chip Carter’s January 15th 2009 post – Gimme Fuel Gimme Fire: Direct vs. Indirect Heat.

2. Pregame=Preheat

Whether you played Pop Warner football, High School hockey, or Collegiate hoops, you had a pre-game ritual. You probably still do! Grilling is no different, and before that soon-to-be-perfect steak hits the grill, make sure your grill is preheated and that the temperature is steady. Preheat times depend on your grill itself, desired temperature, and environmental factors, but giving your gas grill 15 minutes to reach a steady state is good starting point. (Of course charcoal grillers have a different challenge – but we will save that for another day!)


3. Timing Is Everything

I can’t stress the importance of using a timer enough. Think of it as your game clock. As a general rule, meat that is grilled using Direct Heat should be turned only once and this should occur when you reach half your total grilling time. So, for example, on my grill a 1 inch New York Strip done over Medium/High Direct Heat takes about 8 minutes (medium rare) and should be flipped at the 4 minute mark. I don’t know about you guys, but when I’m grilling, there’s usually lots of distractions – having a countdown timer with an alarm keeps me tuned in. Ever seen a football game when the 40 second clock fails? Exactly.

4. Take A Temperature

Get a good meat thermometer and use it. Bottom line. All sorts of methods are out there for determining doneness and in my opinion none of them come without a cost. Cutting into meat while grilling causes tasty juices to be lost and just plain doesn’t look slick. Trying to compare the feel of the meat to the fleshy part of your hand at the base of your thumb? Come on, really. Does that make any sense? Get a good meat thermometer and use it. Most recipes will tell you what your target internal temperature is and after a few reps you’ll never be without one.

5. Pitch A Tent and Let It Rest

Once your culinary masterpiece comes off the grill, cover it with an aluminum foil ‘tent’ and let it rest 3-5 minutes. Resting allows the juices within the meat to redistribute evenly throughout so that they are not lost after the first cut. Do not wrap the meat in foil – in fact its best if the foil does not touch the meat at all.

I hope you find Grill Nation’s 5 Keys to Grilling Success helpful. They’re part of my Game Plan every week! And yes, my fantasy team crashed and burned (see Timing Is Everything: Grillers on the Clock) but March Madness and redemption are just around the corner!

Thanks for playing,

Kevin Pearson

Filed Under: Grill School Tagged With: bbq, beginner, grilling, learning, preheat, technique, temperature, tenting, thermometer, timing

Bubba’s No Fussin’ No Frettin’ BBQ Sauce

January 17, 2009 By Chip Carter

Make Your Own Sauce

Those that know me know that I love my Telecaster and that I love my sauce – so please don’t ask me to choose! But when I’m not working up and down the fret board of that sunburst Tele, I am quite likely to be working up and down a rack of baby backs. Telecaster players know that ‘the twang is the thang’ and those that love my sauces know that ‘the tang is the thang’. So when you gotta put ‘er down, get those ribs on low and slow and make this No Fussin’ No Frettin’ simple sauce from scratch.

What you will need:

1 ½ tablespoons vegetable oil
¼ cup chopped onion (whatever kind of onion you like)
5-6 cloves of garlic chopped or minced (Bubba loves his garlic!)
1 cup of ketchup
½ cup brown sugar
¼ cup cider vinegar
3 tablespoons Worcestershire sauce (Depending on my mood, I like to pump up the volume with another tablespoon or so…feel free to adjust to taste here)
1 tablespoon mustard (yellow or Dijon – a Hot Dijon is a nice twist)
1 tablespoon soy sauce
1 teaspoon chilli powder
Tabasco sauce or your favourite hot pepper sauce to taste.


  • Heat the vegetable oil in a medium sauce pan. Medium-high heat should do (for gas burners, you might want to go with medium – you don’t want to burn your onion and garlic mixture).
  •  Add the onion and garlic, stir occasionally (remember, don’t let these babies burn or even brown as it gives the sauce a burnt taste – just get ‘em nice and soft. Reduce your heat if you have to).
  • Add the rest of the ingredients, and then bring it all to a boil .
  • You can add Tabasco/Hot Pepper Sauce now, as you go, or at the end. (I like to add it after the main ingredients have had a chance to blend a bit, then I can really gauge the amount of Tabasco’s Bubba’s cravin’!).
  • Reduce heat and let it simmer (uncovered) for 15-20 minutes (it may splatter a bit, but its worth it). Stir occasionally.
  • Set aside some in a bowl for dipping, but most of this should be used up and down that rack of ribs during the last 20-30 minutes of grilling time.

 Thanks for checkin’ this out!

– Bubba

Filed Under: Sauces & Rubs Tagged With: bbq sauce

Making the Grade: Prime, Select, and Choice Beef

January 16, 2009 By Chip Carter

Choosing Your Meat

Hello Roy, a great big “Love Ya Meat!” from the good people out here in Portland. My question concerns the grading of beef – what does it really mean?

Rich
Portland, Oregon

Thanks for your question Rich. It’s an important one and something that many of us don’t spend a lot of time thinking about!

For the griller, grading is a standard way to assess the quality of meat you are buying. From the industry perspective, grading helps in the promotion and marketing of quality beef, while assisting producers in getting a fair price for their product. The United States Department of Agriculture (USDA) has been grading beef for more than 75 years and currently operates a voluntary beef grading program.

Whoa, that was heavy! So lets get down to the part that I like…

Grade depends on the so called ‘quality grade factors’ of age and marbling. Age refers to the estimated age of the animal at slaughter and marbling refers to the amount of intramuscular fat in the meat itself. There are actually eight USDA beef quality grades but only three that matter to us – Prime, Choice and Select.


  • Prime grade beef is of the highest quality and features the greatest amount of marbling. As you know from my previous ranting, marbling plays a key role in producing the tenderness, juiciness, flavor and the overall ‘palatability’ of a given cut of beef. (See my “Love Your Meat Post” post on Marbling for all the details). Only 2% of graded beef in the United States is considered Prime and this grade is typically be found in finer restaurants and select meat stores.
  • Choice grade beef is of high quality and falls between Prime and Select grades. This is the grade found widely in the retail and food service sectors.
  • Select grade beef is the lowest grade typically available at retailers. It is lower priced and leaner, but tends to be less tender and flavorful than Choice or Prime grades.

I often get asked whether the premium price tag on Prime grade beef cuts is worth the price. Well, this really depends on you, what you’re willing to spend, and ultimately what you like to eat. No doubt that if tenderness, juiciness and flavor are what you’re after, you’ll get better examples of these characteristics in the higher grade cuts.

Until next time – like I always say…

Love your meat,

Roy

Filed Under: Love Your Meat Tagged With: beef, choice, grades of beef, grading, meat, prime, select, USDA

Gimme Fuel, Gimme Fire: Direct vs Indirect Heat

January 15, 2009 By Chip Carter


Heat Drama and Grillin

Every griller knows how important the heat from the burner or the charcoal is to that perfect steak – and to be honest, the beautiful part about grilling is the simplicity. But for those who want to expand their grilling horizons – you’ll be richly rewarded if you understand the different approaches to heat, as described below. And remember: whether you use charcoal or gas grills, direct or indirect heat – always grill with the lid down!

Direct Heat

To grill using Direct Heat, place your food on the grill directly over your grill’s source of heat. Turn the food once, when you are halfway through the total grilling time. DO NOT FLIP OUT!! I’m not a fan of multiple turns or flips – this result in unnecessary heat/cool cycles and produces inconsistent results. Not good. Anyway, Direct Heat is best used for foods with total grill times of 20-25 minutes or less, such as steaks, chicken breast, sausages, brauts and the like – not to mention your grilled veggies.


Indirect Heat

When you think indirect heat, think convection oven, but with way more flavor and way more fun!!! Heat rises from the heat source and bounces off the grill lid and surfaces, slowly and evenly cooking food from all sides. To grill using indirect heat, make sure food is not placed directly over your grill’s heat source. With charcoal this can be accomplished by placing charcoal under both sides of the charcoal grate. I like to separate the sides by placing a drip pan in the middle. On a gas grill, preheat the grill using all burners and once you’ve reached your target temperature, shut off your middle burner(s) directly under the food. Adjust the burners on each side of the food accordingly.

Don’t have multiple burners??? No worries – check out ‘Grill Gear’ section for the necessary upgrades you need my friend!

I like to use indirect heat when I’m doing foods with more than 20-25 minutes of grilling time. If you use indirect heat, you’ll soon find that doing whole chickens, turkeys, beef roasts, pork roasts and ribs becomes a tender and juicy snap.

DO NOT FLIP YOUR LID! – Ok, this may be a little harsh, feel free to open the lid to baste, and to check for doneness, but otherwise keep that lid closed, valuable heat gets lost and throws off your cooking time every time that lid pops!

Whatever method you deploy – be sure to tell us your grilling stories, share your secrets if you want, including pictures of your grilling spread on the Grill Nation forums!

Until next time,

Chip

“Gimme Fuel Gimme Fire – It’s The Grill That I Desire”

Filed Under: Grill School Tagged With: bbq, direct heat, grilling, indirect heat, temperature

Timing is Everything: Grillers on the Clock

January 14, 2009 By Chip Carter

Timing Is Everything

I believe it was the great Vince Lombardi who once said (and I expect to be corrected by one of my fellow grillers out there if I’m wrong) “…we didn’t lose, we just ran out of time…”.

The importance of timing in the game of football simply cannot be debated. Whether we’re talking about the play clock, the 40 second clock or the internal clock in a quarterback or a receivers head. “One thousand, two thousand, etc, etc.”


Timing is everything. Including in the great pursuit of that perfect grilling experience. I know, I know, you’re thinking that this Monday morning quarterback just can’t let Sunday go (did you see Denver go for two to win with seconds left against the Chargers instead of kicking the PAT – that’s chutzpah, but I digress…).

There’s method to my madness here. While we wouldn’t think of going onto the gridiron without the clock, we shouldn’t go onto the grill without the clock either. Bottom line – A timer should be an essential weapon in your grilling arsenal, plain and simple. Digital or analog, count up or count down, bells and whistles or vanilla – get one. Unlike the average football play which lasts only seconds, most grill times last considerably longer – so even Peyton Manning’s internal clock won’t get it done here!!!

Not only will a timer improve your grilling consistency under ideal conditions, but you’ll adapt better to whatever your grilling menu and mother nature throws at you! Its an inexpensive, simple grilling innovation that will elevate your game without creating a salary cap nightmare. If only things were this easy for my fantasy football team (can you say Tom Brady…).

Filed Under: Grill School Tagged With: bbq, grilling, timer, tips

Schwartz’ Steak and Beef Spices

January 14, 2009 By Chip Carter

Schwartz’s Steak Spice

I’m definitely not the kind of guy who’s ever going to be tied down to one rub, especially not a commercially prepared one. There are just too many spice combos to try and whip up myself! However, every now and then Bubba comes across a spice blend he’s gotta write home about! So I’m gonna  tell you about a rub I discovered on a trip to Montreal, Canada to visit some buddies – Schwartz’ Steak and Beef Spice. I’m not saying it’s all I’ll ever use on my BBQ, but it did cause me to go through a bit of a “Schwartz’ phase”.

Now, before I go any further, I’ve gotta warn you that I have no idea if you can get this stuff anywhere but in Montreal. Still, it’s so good that I just had to share it with the Nation. If you find yourself there or have some friends or relatives who can get it and ship it to you, consider it. It’s really that good.


Schwartz’ is a hole in the wall delicatessen in downtown Montreal – one of these places with line ups around the block at any time of the day. They’re specialty is Montreal Smoked Meat, an awesome, greasy, spicy smoked meat that’s great with hot rye bread and an even hotter mustard (smoked meat is something you should definitely try when in Montreal. Schwartz’ is the “classic” place to go, but you can get it elsewhere, so I’ve been told).

So I’m eating my Smoked Meat Sandwich elbow to elbow with my friends and everyone else in the place, and I’m really into the spice on the meat. It’s a blend of all sorts of things, but what really stands out is the coarseness of all the herbs and spices, chunks of salt, peppercorns and garlic and mustard seeds and other good stuff. I don’t know about you but I find that a lot of commercial blends grind everything up so fine and let salt dominate the whole mess that there isn’t any pow left, if you know what I mean. Schwartz’ spice blend is still salty, but there are so many other things going on and they haven’t pounded the smack out of everything – this blend “gets it” and gets it right. (Side note – of course, finely ground chili powders, cumin, and paprika can all have their place in a rub – I’m talking about those packets that basically look and taste like fake fire-engine colored salt.)

So anyway, I’m eating my smoked meat sandwich, and I notice they actually sell their spice blend. Naturally, I buy a couple to take home as a souvenir, the best kind being the kind you can eat, of course. And I also buy a couple of their Poultry Spice Blend thinking that it’ll probably be good, too.

I take it home and try it out, first on steak. Whoa! It’s just awesome. And I’ve had a lot of steak with a lot of incredible homemade rubs in my time. This leads to me trying it on pork and burgers and even a beef roast. I’m even adding dashes of it to gravies and sauces as the week goes on. Pretty soon, I’m regretting picking up only two little bottles. And the poultry seasoning is no slouch either (less salty than the Beef Blend, more herbs). It’s great on chicken, and I even tried it on pork – I actually preferred the poultry blend on the pork.

They don’t actually list their exact ingredients, stating only that there are spices, garlic, salt and herbs. The good folk at Schwartz’ is protecting a secret lasting generations, I guess. But they’ve really hit on a genius blend of simple things.

Anyway, from a die-hard do-it-yourselfer, a rave review for a prepared blend is a rare thing. Then again, it’s a good family recipe and one that’s not available at any ol’ store, so I won’t feel too bad.

Next time you’re in Montreal, you know where to go. And if you are heading there, let me know, will ya? Now excuse me while I call up my Canadian buddy and see if he wouldn’t mind running down to Schwartz’, and then to the mail box for Bubba…

– Bubba

Filed Under: Sauces & Rubs Tagged With: montreal, schwartz, spice, steak

Advertisement


Recent Posts

Fish Tacos on the Weber Kettle Grill

Hey all, this could be the next best thing to an actual shore lunch, we used … [Read More...]

  • Where’s Summer? We’re Ready to Grill!
  • Winter Cookery: The Thermal Jacket for the Yoder YS640s
  • Baby Back Ribs on Yoder Smokers YS640S Smoker

Follow us online

  • Twitter


Copyright © 2022